How to enable camera and microphone on Windows Server Remote Desktop
Using a camera and/or microphone on Windows Server requires the installation of the “Remote Desktop Services” role within Server Manager.
This feature of Windows Server requires CAL licences which we do not supply, however a 120 day trial/grace period is provided in Windows from when the Remote Desktop Services role is enabled on the server. Once the trial period is over the Remote Desktop Services role within Windows must be licenced with CALs, or alternatively the operating system needs to be completely reinstalled and data erased so that the process below can be repeated.
Enabling Remote Desktop Services
To enable Remote Desktop Services to permit the connection of a microphone and/or camera carry out the following steps:
- In the Start menu search for “Services”
- In the Services window, scroll down to the Windows Update service. Right click on this and go to “Properties”.
- Change the “Startup Type” to “Automatic (Delayed Start)” and then click OK.
- Important: Restart the operating system and then log back in.
- In the Start menu search for “Server Manager”
- Once loaded, at the top right click Manage -> Add Roles and Features
- Click Next until you get to the “Server Roles” section
- Within the “Roles” section scroll down to “Remote Desktop Services and tick both of the following options:
a) Remote Desktop Connection Broker
b) Remote Desktop Session HostIf you are prompted to add any additional features click “Add Features” when prompted
- Click “Install” and follow the steps to complete the installation
- Once the installation is complete you should then restart the operating system and then log back in.
Passing your camera/microphone to your remote desktop
To pass your camera/microphone through to the remote desktop, before connecting you MUST configure your Remote Desktop Connection client on your local desktop to pass these devices through to the Remote Desktop. If this is not done you will still not be able to use these devices. Please note this guide is for Windows users only, not macOS or iOS:
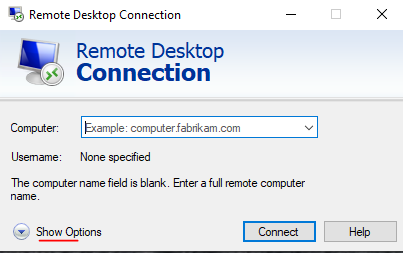
- On your local desktop, open your Remote Desktop Connection client and click the “Show Options” button

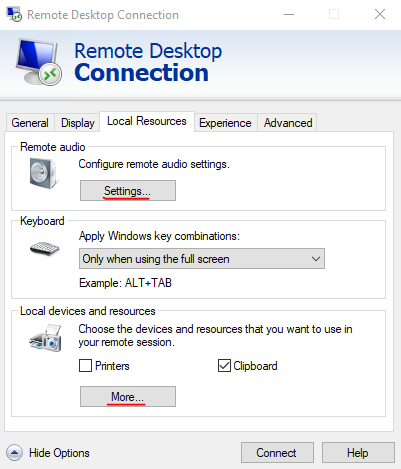
- Click the “Local Resources” tab and then click “Settings” under the “Remote audio” button

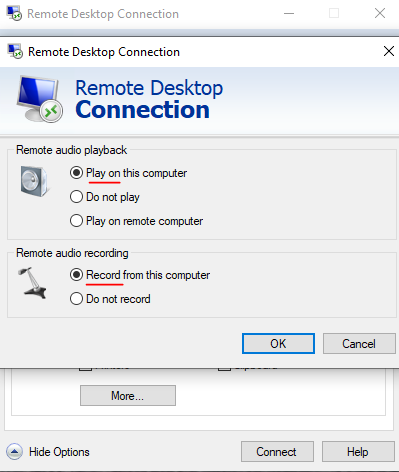
- If you want to passs through your microphone click “Record from this computer” under the “Remote audio recording” header (if you also want to hear the audio on your local desktop click “Play on this computer” under the “Remote audio playback” header). Click “OK”.

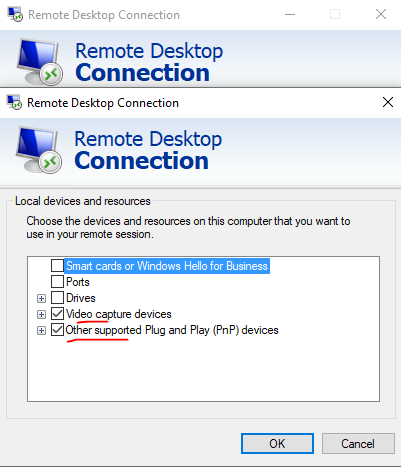
- Under “Local devices and resources” click the “More…” button and select your camera device and any other devices you would like to make available to your remote desktop. Generally it’s a good idea to also tick “Other supported Plug and Play (PnP) devices.

- You can then connect to your remote desktop as you would usually do so.
Days remaining on RDS grace period (once Role is installed)
To find out how many days are left on the RDS grace period – this only works if Remote Destop Services Session Host is installed as a role from the earlier steps:
-
- In the Start menu search for Run
- In the run box type “tlsbln.exe” and then click “OK”.
There will then be a pop-up notification at the bottom right of the screen informing you of the days remaining on the grace period for RDS.

